В настоящее время вы находитесь на странице с руководствами . Выберите один из продуктов, чтобы сразу перейти к руководству по этому продукту. Не можете найти ? Тогда попробуйте вбить в поле поиска и модель, чтобы найти нужное руководство . На ManualsPDF.ru в настоящее время имеется 7 руководств . Самые популярные :
- Huskystar 215
- Huskystar E10
- Huskystar E20
Последнее добавленное руководство было добавлено 2018-08-22, и это Huskystar C10.
|
10 898 торговых марок |
Diplodocs позволяет скачать несколько типов инструкций для наилучшего использования изделий HUSKYSTAR. |

|
Поиск торговой марки Расширенный поиск Вам требуется помощь по использованию изделия?
Все инструкции по категориям |
Популярные инструкции:4 часто скачиваемых инструкций 215 — 207 — 224 — 219 |
| Часто задаваемые вопросы | Свяжитесь с командой Diplodocs | Недавно искали… Последние поступления |
Карта сайта | |||||||||
|
Торговые марки на букву A B C D E F G H I J K L M N O P Q R S T U V W X Y Z # |
Copyright © 2005 — 2012 — Diplodocs —
Все права защищены.
Торговые марки принадлежат их соответствующим владельцам.
- Home
- Бренды
- Huskystar
- Швейные машины
Ищете товар?
Искать среди 7 Huskystar товаров

Huskystar 215

Huskystar E10

Huskystar E20

Huskystar C10

Huskystar C20

Huskystar ER10
Huskystar 215
Huskystar E10
Huskystar E20
Huskystar C10
Huskystar C20
Huskystar ER10

Huskystar EM10
В этой категории вы найдете все руководства пользователя для Huskystar Швейные машины. Если вашего Швейные машины нет в этом списке, пожалуйста, воспользуйтесь окном поиска в верхней части интернет-сайта. Ваш Швейные машины мог быть размещен в другой категории.
В детстве мама научила меня шить. Но после того, как я пару раз ломала ее старый Veritas 8014/43, меня «перевели» на бабушкину ручную, доисторическую. Мастерство мое чем дальше, тем больше росло, и очень уж мне хотелось шить на чем-то более современном.
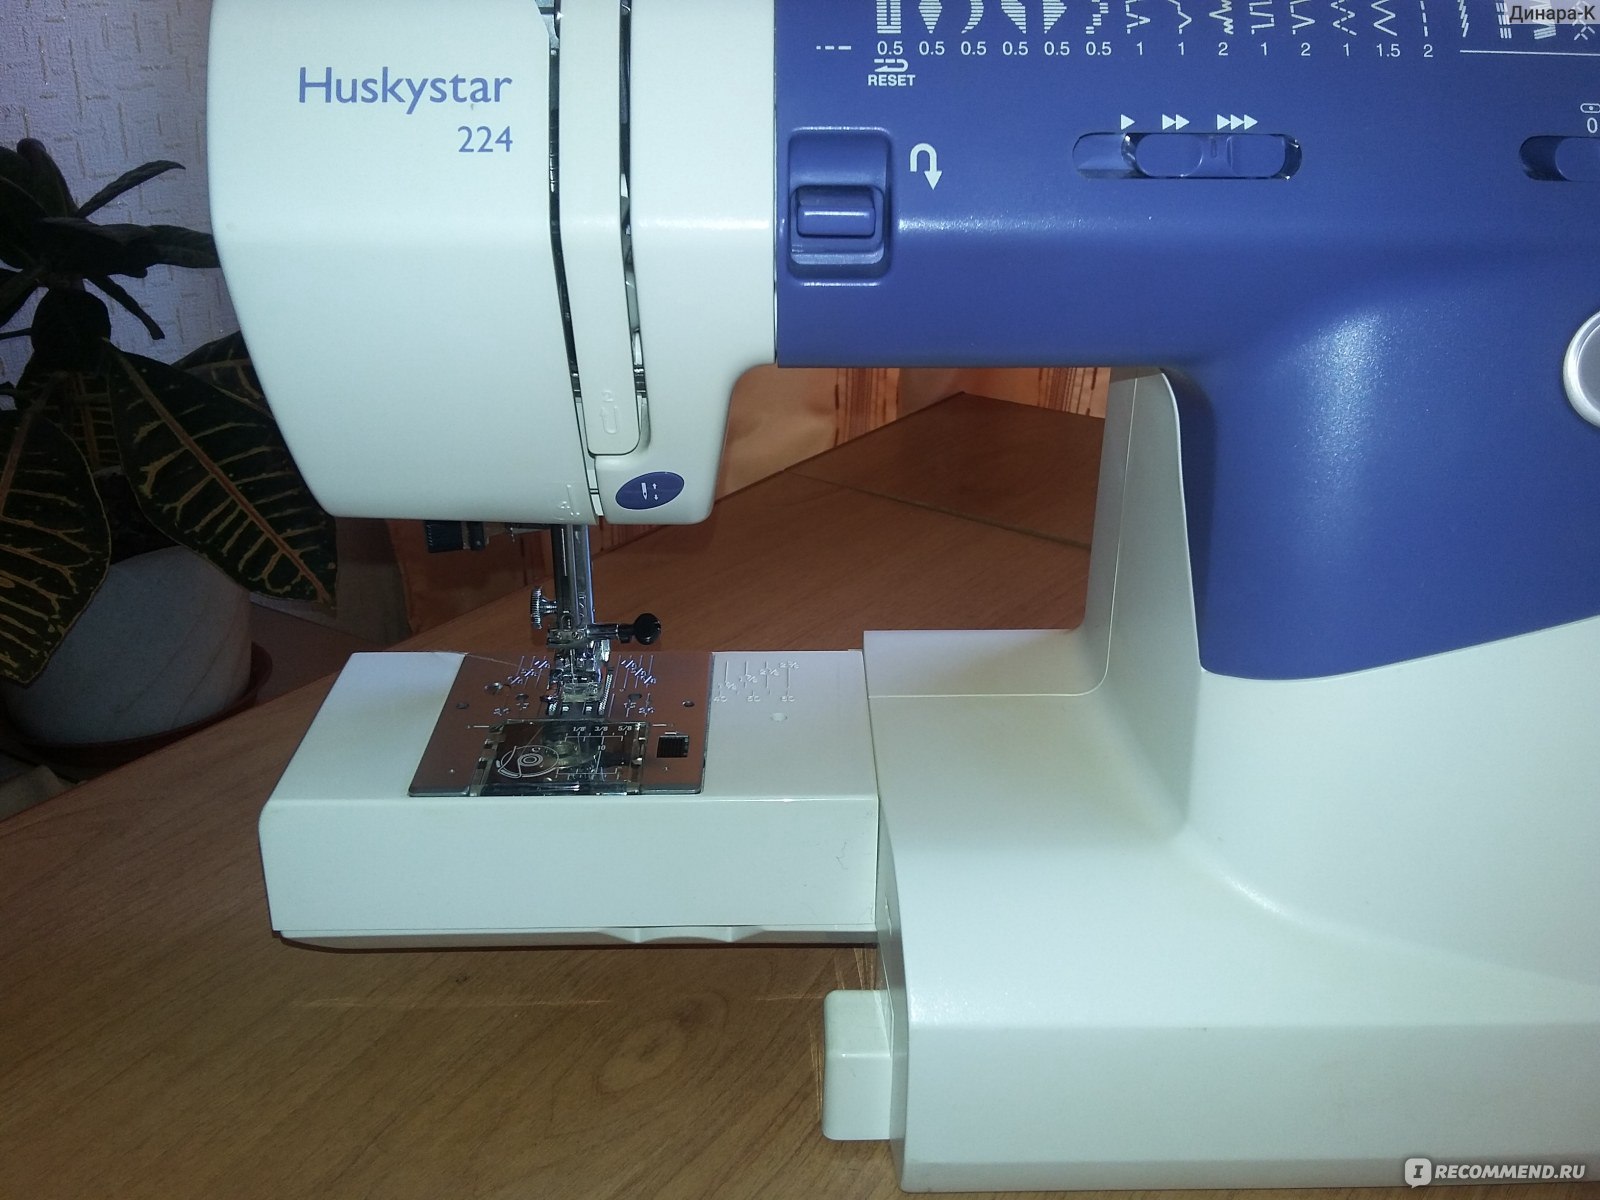
И вот пошли мы с папой лет 11 назад и купили это чудо. Сейчас уже не помню, какова была цена, но не очень высокая, вполне себе приемлемая.
Первое, что бросилось в глаза, это горизонтальный челнок (я-то привыкла к вертикальному на старых машинках). Но это просто дело привычки. Теперь уже другого расположения не представляю, это правда очень удобно.

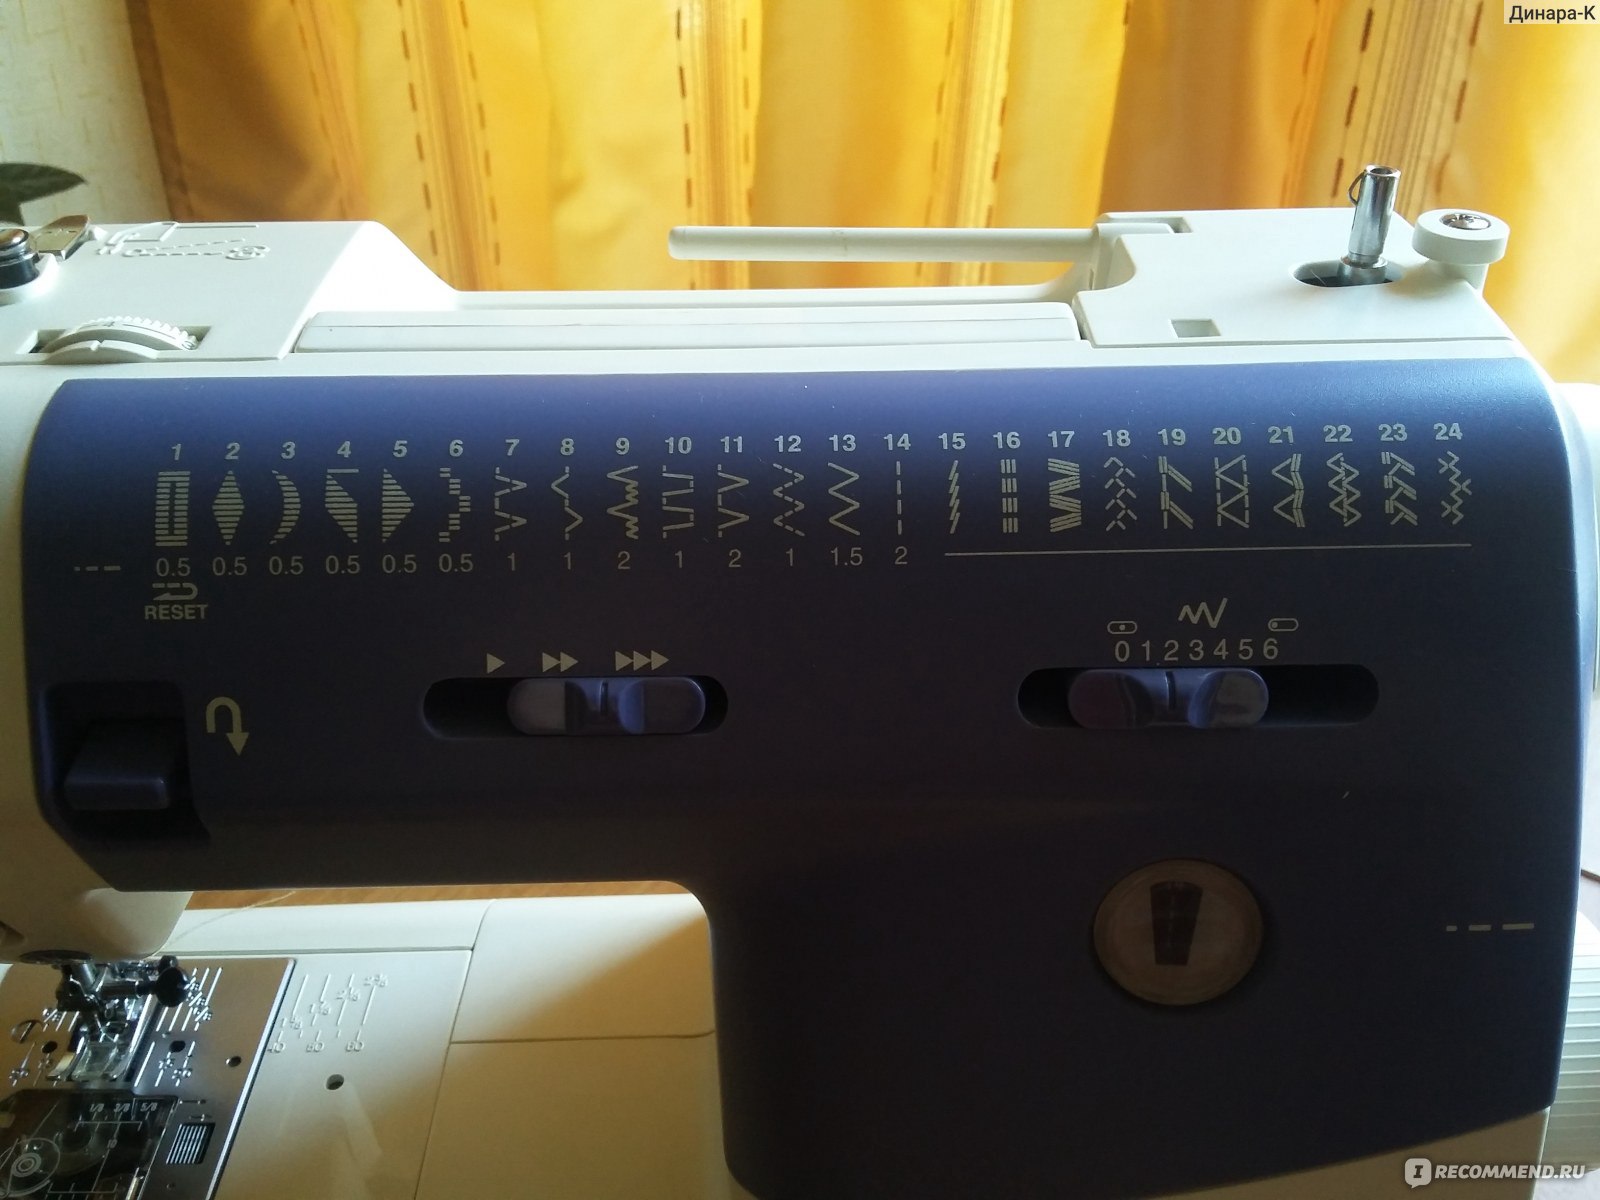
У этой швейной машины 24 вида строчек, среди которых декоративные гладьевые швы, эластичные швы (подойдут для трикотажа), а также выполнение автоматических петель под размер вашей пуговицы.
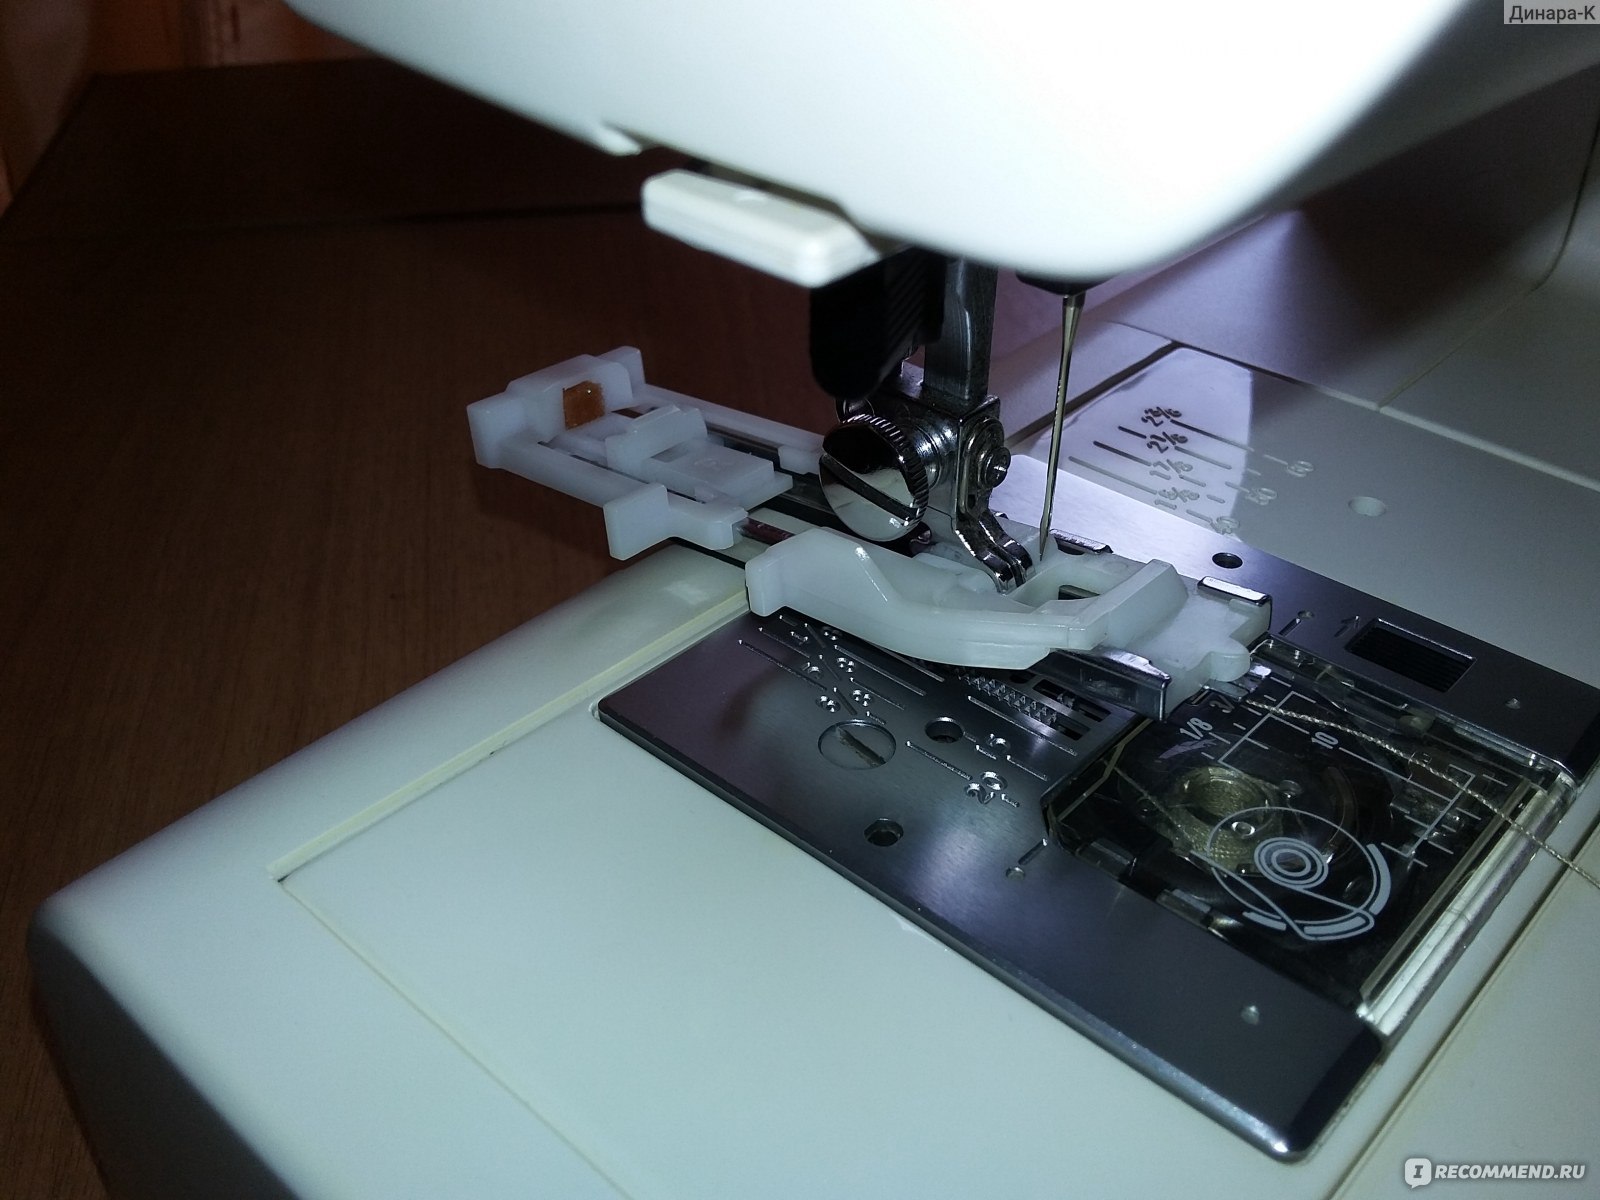
Лапка для автоматических петель
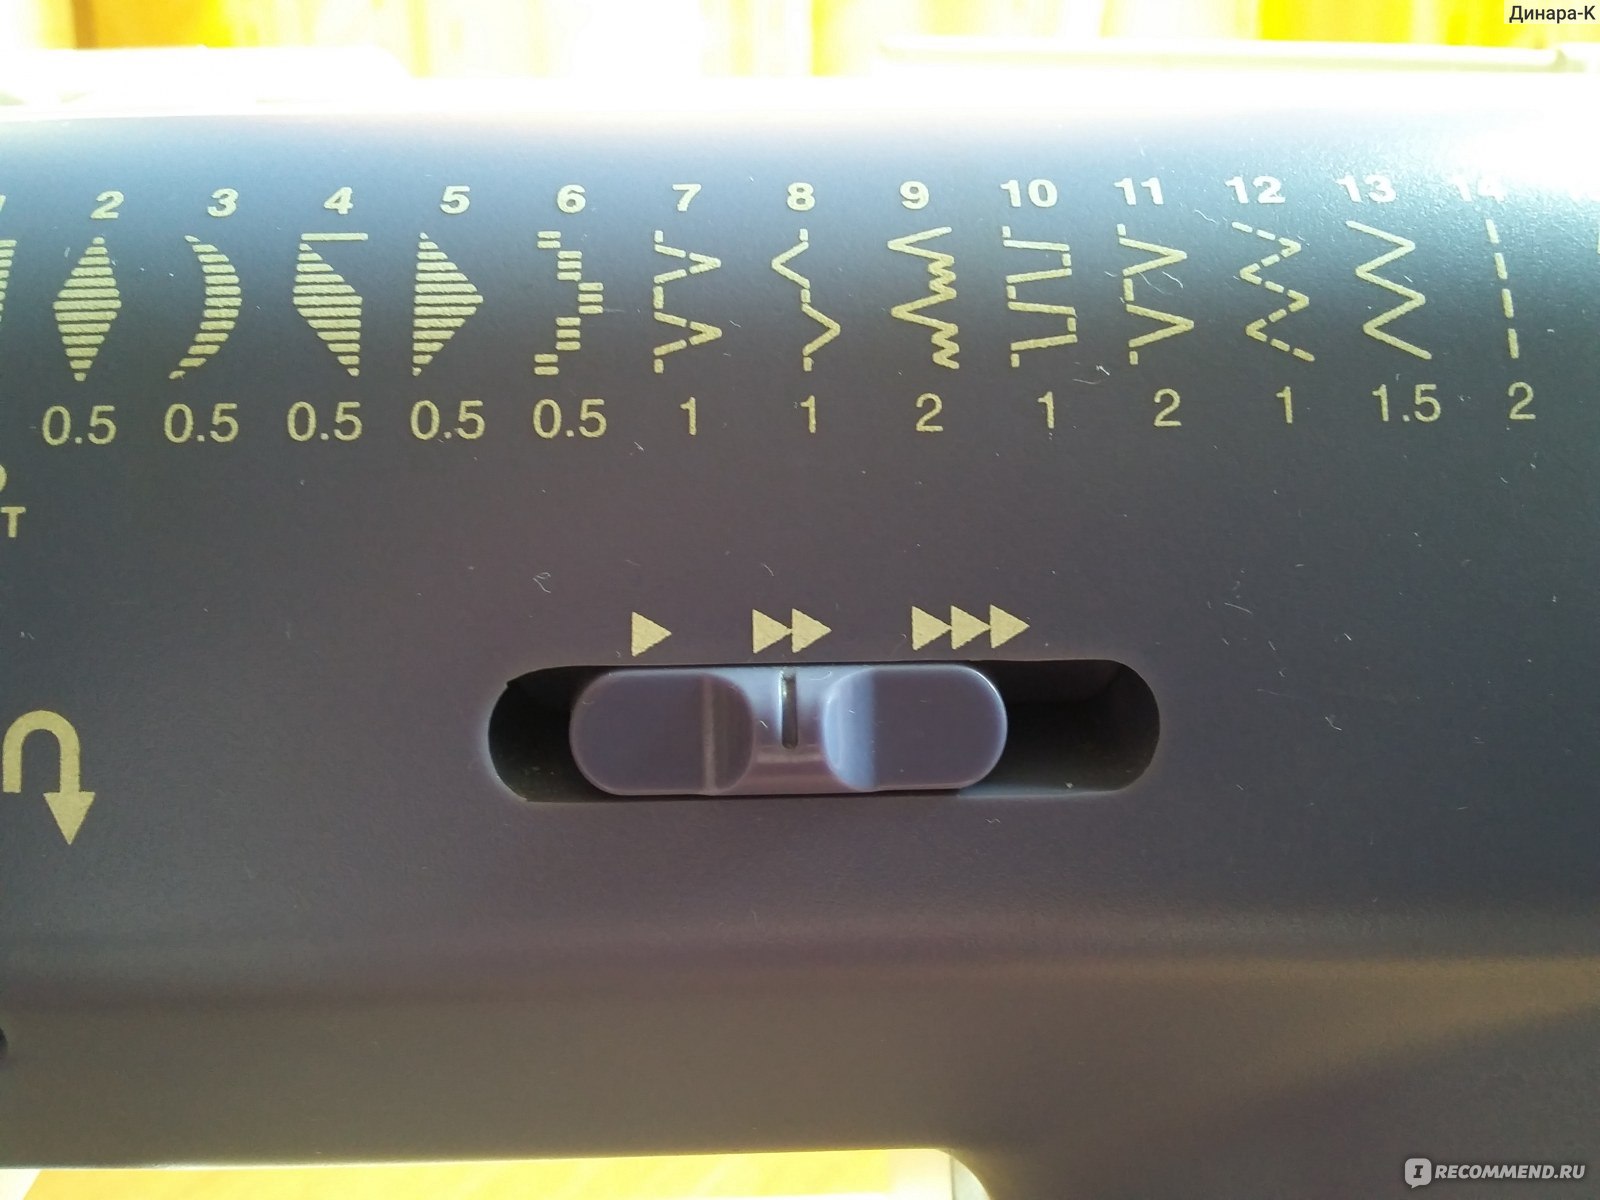
Еще можно регулировать скорость шитья небольшим рычажком на передней панели. Есть три уровня скорости. Это очень удобно, когда надо выполнить какую-нибудь мелкую работу, как сильно не жми на педаль, но если стоит самая низкая скорость, игла будет двигаться медленно, и вы не накосячите.
Также на передней панели находится клавиша реверса для подачи ткани назад, сбоку находится нож для обрезания нити (экономит время, так как не надо каждый раз возиться с ножницами). И еще целая куча небольших особенностей, делающих процесс шитья приятным и комфортным — нитевдеватель, кнопка верхнего или нижнего положения иглы, два стержня-держателя катушки и др.
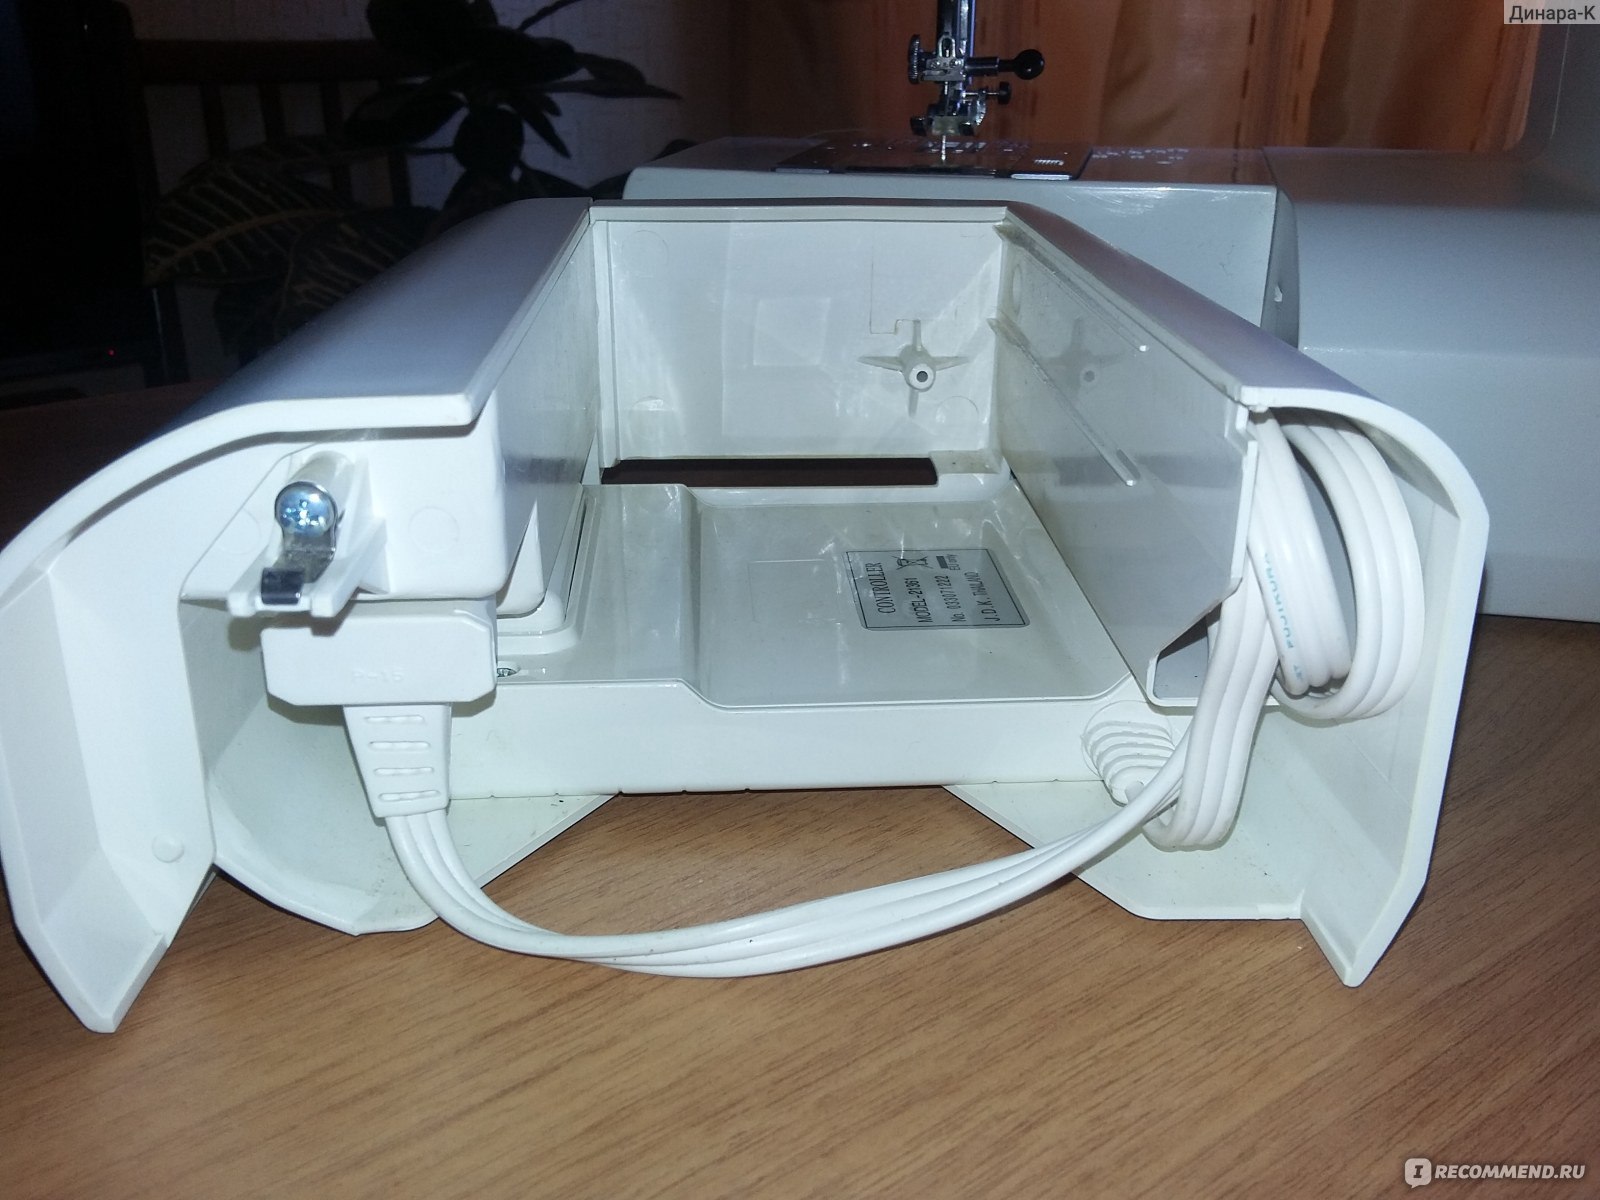
Отдельно хочу сказать о рукавной платформе (свободный рукав).
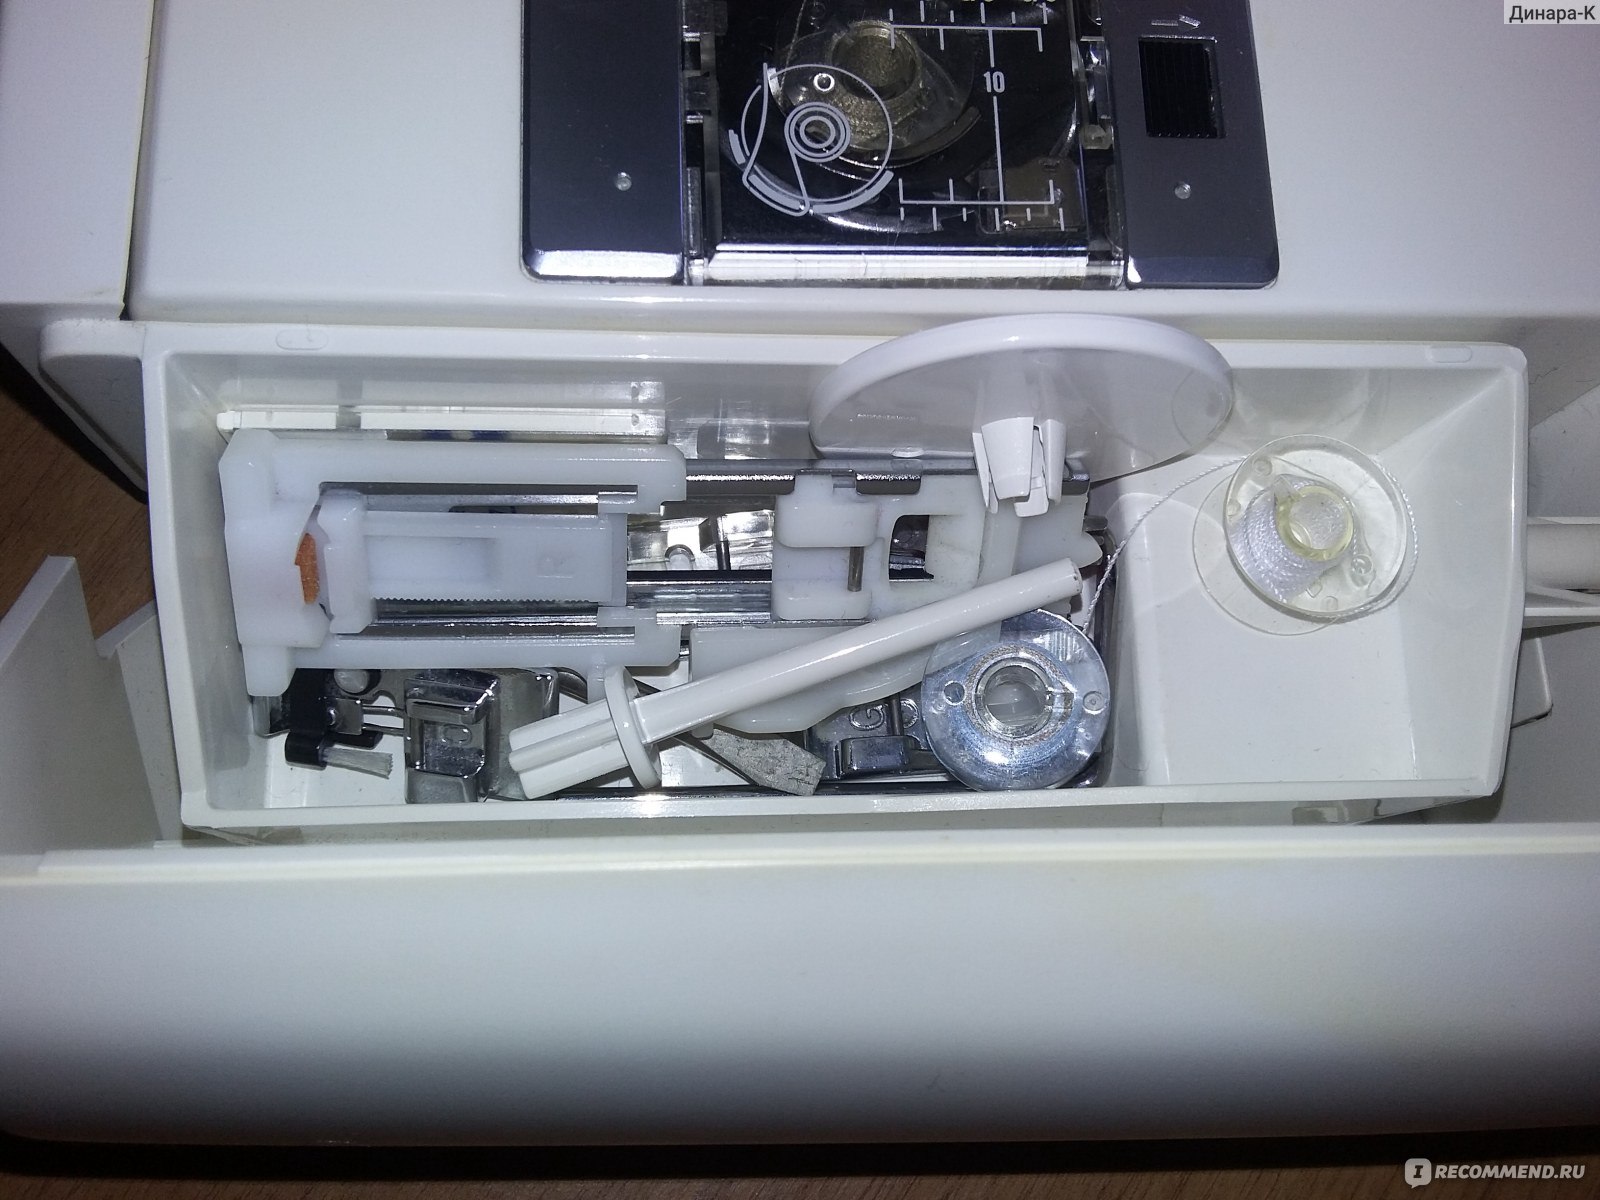
Она получается, если убрать съемную часть машинки, о которой отдельный разговор. Этот небольшой отсек предназначен для хранения педали, а если его открыть спереди, то туда поместятся все необходимые аксессуары (шпульки, лапки, набор игл, щеточка для чистки и пр.)
Было время, когда сразу после рождения ребенка я долгое время не шила, некогда было. А потом однажды села за машинку, и поняла, что о нужной мне тогда настройке не помню. Вот тут на помощь пришла инструкция, которая очень простая, в ней легко ориентироваться, написано обо всем, по делу, и с понятными иллюстрациями.
Единственная чайная ложечка дегтя — это мягкий чехол. С одной стороны, удобно — мало места занимает. Но с другой, неудобно для транспортировки.
В целом, эта швейная машинка очень проста в обращении. С ней справится даже новичок в деле шитья. И служит она мне уже 11 лет бесперебойной работы. А я на ней чего только не шила:от шифоновых блузок до пальто.
- Главная
Бытовая техника
Техника для дома
Швейные машины
- Huskystar 50

от 11 499 ₽
Redmond
Умный очиститель воздуха REDMOND SkyAirClean 3706S
- Tmall 12073 ₽
- Озон 12418 ₽
Доставка в Москве Бренд: Redmond
от 3 350 ₽
Мелеон
Минимойка Лонгер-душ с емкостью 20л
- Amazon 3852 ₽
- Озон 3618 ₽
Доставка в Москве Бренд: Koopman int.
от 3 790 ₽
Мелеон
Минимойка Лонгер-форте c емкостью 20л
- Amazon 4358 ₽
- Озон 4093 ₽
Доставка в Москве Бренд: Koopman int.
от 3 290 ₽
Мелеон
Минимойка Лонгер-форте с емкостью 10л
- Tmall 3454 ₽
- Amazon 3783 ₽
Доставка в Москве Бренд: Koopman int.
от 5 490 ₽
Мелеон
Очиститель-ионизатор воздуха Супер Плюс Турбо
- Wildberries 6093 ₽
- Amazon 6313 ₽
Доставка в Москве Бренд: Мультидом трейдинг
от 4 750 ₽
Мелеон
Очиститель-ионизатор воздуха Супер Плюс Экос
- Amazon 5462 ₽
- Tmall 4987 ₽
Доставка в Москве Бренд: Cosmodrome games
от 2 790 ₽
Мелеон
Очиститель-ионизатор воздуха Супер Плюс-Ион
- Wildberries 3096 ₽
- Amazon 3208 ₽
Доставка в Москве Бренд: Cosmodrome games
от 5 370 ₽
Мелеон
Очиститель-ионизатор воздуха Супер Плюс Био
- Wildberries 5960 ₽
- Tmall 5638 ₽
Доставка в Москве Бренд: Cosmodrome games
от 1 840 ₽
Мелеон
Минимойка с емкостью 20 литров
- Озон 1987 ₽
- Amazon 2116 ₽
Доставка в Москве Бренд: Eos
от 1 580 ₽
Мелеон
Минимойка с емкостью 10 л
- Озон 1706 ₽
- Amazon 1817 ₽
Доставка в Москве Бренд: Eos
от 3 030 ₽
Мелеон
Минимойка Лонгер-форте без емкости «Компакт»
- Tmall 3181 ₽
- Озон 3272 ₽
Доставка в Москве Бренд: Bradex
от 3 250 ₽
Мелеон
Минимойка Лонгер-душ с емкостью 10л
- Amazon 3737 ₽
- Wildberries 3607 ₽
Доставка в Москве Бренд: Bradex
|
10 898 торговых марок |
Diplodocs позволяет скачать несколько типов инструкций для наилучшего использования изделий HUSKYSTAR. |
|
Поиск торговой марки Расширенный поиск Вам требуется помощь по использованию изделия?
Где моя инструкция?
Все инструкции по категориям |
Вы можете скачать с сайта Diplodocs инструкцию HUSKYSTAR в формате PDF.Введите модель изделия HUSKYSTAR…
|
 Новые инструкции для HUSKYSTAR
| Часто задаваемые вопросы | Свяжитесь с командой Diplodocs | Недавно искали… Последние поступления |
Карта сайта | |||||||||
|
Торговые марки на букву A B C D E F G H I J K L M N O P Q R S T U V W X Y Z # |
Copyright © 2005 — 2012 — Diplodocs —
Все права защищены.
Торговые марки принадлежат их соответствующим владельцам.
В настоящее время вы находитесь на странице с руководствами Huskystar швейная машина. Выберите один из продуктов, чтобы сразу перейти к руководству по этому продукту. Не можете найти Huskystar ? Тогда попробуйте вбить в поле поиска Huskystar и модель, чтобы найти нужное руководство Huskystar. На ManualsPDF.ru в настоящее время имеется 7 руководств Huskystar . Самые популярные Huskystar швейная машина:
- Huskystar 215
- Huskystar E10
- Huskystar C10
Последнее добавленное руководство Huskystar было добавлено 2018-08-22, и это Huskystar C10.
Содержание
- Husqvarna Huskystar 219
- Инструкции для Husqvarna Huskystar 219:
- Характеристики Husqvarna Huskystar 219:
- Строчки Husqvarna Huskystar 219:
- Комплектация
- Обратите внимание!
- Опубликуйте ваш отзыв
- Швейная машина Husqvarna Huskystar 219
- Технические характеристики Швейная машина Husqvarna Huskystar 219
- Словарь терминов
- Описание товара
- 1 отзыв о Швейная машина Husqvarna Huskystar 219
- Лучшие варианты покупки по низкой цене
- Как настроить швейную машинку huskystar 219
- Швейная машина Husqvarna Huskystar 219 — купить по выгодной цене на Яндекс.Маркете
- Как настроить швейную машинку huskystar 219
- Швейная машина Husqvarna Huskystar 219 — купить по выгодной цене на Яндекс.Маркете
Husqvarna Huskystar 219
Производитель: Husqvarna
Электромеханическая швейная машина Хускварна Хаскистар 219

Инструкции для Husqvarna Huskystar 219:
Характеристики Husqvarna Huskystar 219:
Строчки Husqvarna Huskystar 219:

- Прямая бельевая петля
- Ромбовидная сатиновая строчка для декоративной отделки
- Фестонный шов. Для декоративной отделки и обработки края
- Ромбовидная сатиновая строчка для декоративной отделки
- Треугольная сатиновая строчка для декоративной отделки
- Декоративная строчка. Часто используется для пришивания шнура или декоративных нитей.
- Краеобметочный шов. Используется для декоративной обработки кромки ткани
- Мостовой стежок. Используется для сшивания двух полотен ткани так, чтобы между ними оставался зазор
- Потайная строчка для эластичных тканей. Используется для подшивания кромки изделия, например брюк, если строчка не должна быть видна.
- Эластичная шаговая строчка. Используется для сшивания двух полотен, например лоскутной работы.
- Краеобметочный шов. Используется для декоративной обработки кромок тонких тканей
- Трехступенчатый зигзаг. Может использоваться например для пришивания резинки
- Зигзаг
- Прямая строчка
- Трикотажный шов. Применяется в качестве прямой строчки при шитье изделий из трикотажа средней толщины
- Усиленная прямая строчка. Рекомендуется для шитья эластичных тканей или толстого трикотажа. Также этот стежок применяется там, где нужна крепость и надежность шва. Используйте его для усиления таких деталей как крючки и проймы, для пошива рюкзаков и т.п. Строчка шьется двумя стежками вперед и одним стежком назад, образуя шов, который нелегко порвать
- Усиленный зигзаг. Может использоваться для сшивания тяжелых эластичных тканей и всех типов работ, для которых используется зигзаг. Его можно также использовать как декоративную строчку
- «Перьевая» строчка. Используется в качестве декоративной строчки и для сшивания встык
- Оверлочная строчка. Используется для одновременного сшивания и обметки края не очень склонных к осыпанию материалов
Комплектация
- Лапка стандартная
- Лапка для декоративных строчек
- Лапка краеобметочных строчек
- Лапка для невидимой подгибки
- Лапка для вшивания молнии
- Лапка для выметывания петли
- Вспарыватель
- Набор игл
- Стержень для второй катушки
- Фетровая прокладка и пластинки для катушки
- Линейка-направитель
- Кисточка
- Отвертка
- Шпульки
Обратите внимание!
«Швейный Мир» является официальным дистрибьютором швейных машин фирмы Husqvarna Viking. Покупая продукцию Husqvarna Viking в наших магазинах, Вы получите качественную машину обеспеченную гарантийным и сервисным обслуживанием.
Опубликуйте ваш отзыв
Отзывы о товаре могут оставлять только зарегистрированные покупатели.
Источник
Швейная машина Husqvarna Huskystar 219

Цвет на изображении может
отличаться от действительного рисунка.
Оценка на основе мнений 1 покупател я
| Производитель | Husqvarna |
| Тип управления | электромеханическое |
| Тип челнока | ротационный горизонтальный |
| Выполнение петли | автомат |
| Строчки | Обметочная, потайная, эластичная, эластичная потайная, «зигзаг» |
| Рукавная платформа | есть |
Средняя цена в магазинах не определена.
Технические характеристики Швейная машина Husqvarna Huskystar 219
Общие характеристики
Производитель Husqvarna Тип управления электромеханическое Тип челнока ротационный горизонтальный Регулировка давления лапки на ткань есть Кнопка реверса есть Максимальная высота подъема лапки 12 мм Освещение есть
Швейные операции
Количество швейных операций 18 Выполнение петли автомат Строчки Обметочная, потайная, эластичная, эластичная потайная, «зигзаг» Максимальная длина стежка 4 мм Максимальная ширина строчки 6.5 мм
Комплектация
Лапки для вшивания молнии, обметочная, для подрубки
Конструкция
Рукавная платформа есть Нитевдеватель есть Чехол мягкий Переключатель положения иглы (верх/низ) есть Вес 8 кг
Особенности
Дополнительная информация Ручка для переноски, электронный регулятор скорости, специальная система, предотвращающая запутывание нити
Словарь терминов
Полная информация о товаре, изготовителе, комплектации, технических характеристиках и функциях содержится в технической документации.
Описание товара
1 отзыв о Швейная машина Husqvarna Huskystar 219
![]()
Опыт использования: больше года
Достоинства
Тихо шьет, большое количество строчек, не требует особого ухода
Недостатки
Нельзя сделать петлю на толстых тканях, так как ткань просто не двигается под лапкой.
Комментарий
Моей машинке уже более 9 лет, за это время проблем не возникало, все что надо бывает зашить дома, шьет: молнии, петли, обметка, штопка, усиленный шов. Хорошая инструкция, возможность докупить лапки (отдельно докупала лапку для потайных молний).
Количество отзывов: 1
Ваш отзыв поможет кому-то сделать выбор. Спасибо, что делитесь опытом!
Лучшие варианты покупки по низкой цене
Где купить дёшево? Рассмотрите предложения с доставкой или самовывозом. Сравнение цен онлайн. Выберите удобное для себя место приобретения.
Возможно, вас также заинтересует, что с этим товаром часто смотрят
Источник
На машинке шью и тонкие ткани и толстые. Недавно сшила пальто.И джинсы дочке переделывала. На оврлоке оказалось все легко и просто. А я боялась что не осилю! Швейный советник все подсказывает, хотя корректировать тоже приходится. Ткани то все разные. Но по крайней мере никогда не смотрю как настраивать шов в инструкции, смотрю что рекомендует советник и там уже все ясно. А замена пластины при распошивальных швах только в первый раз кажется долгой. А когда делаешь это чаще и не надо уже в инструкцию заглядывать, то все быстро. Особенно я люблю 4-х ниточным швом обрабатывать сыпучие ткани, так класно и шить потом намного удобнее, когда все уже обработано.
![]() Аманда
Аманда
У меня Платинум 770,я очень довольна.Когда подошло время покупать машинку,я сразу знала что это будет именно хускварна.Ни какой брайзер и рядом не стоял.Моя свекровь давно работала в швейном магазине и в машинках разбиралась поэтому ,и купила себе хускварну (не помню точно модель какая-то простенькая) и уже больше десяти лет прекрасно на ней шьет,то же самое у ее подруг которые купили хускварны,кто же взял себе брайзеры или поменяли их на другие машинки или несколько раз отдавали в ремонт.У моей сестры хускварна уже восемь лет и никаких проблем.Я однажды была у соседки,которая при мне шила на своем брайзере купленом год назад,он очень громко стучал. у моей мамы чайка 30-летней давности тише шьет чем этот брайзер.
![]() Ленка-2
Ленка-2
У оверлока Husqvarna Husky Lock 936 швы такие:
4-ниточный шов,
3-ниточный узкий и широкий шов,
3-ниточный плоский шов,
3-нитоный ролевый шов,
3-ниточная узкая кайма,
2-ниточный узкий и широкий шов,
2-ниточный плоский шов,
2-ниточный ролевый шов,
2-ниточная узкая кайма,
цепной стежок,
двойная узкая и широкая строчка,
тройная строчка,
5-ниточный оверлок.
Еще что очень удобно у него есть функция — свободный рукав.
![]() Olgiya
Olgiya
Husqvarna Husky Lock 936 ,я на него тоже запала ,  на фотохостинг →
но есть вероятность что его не будет в продаже ,тогда прийдётся покупать Пфафф 4852.
![]() Жи Лена
Жи Лена
Ура, ура наконец то появилась счастливая обладательница оверлока Хускварна. Я собираюсь к 8 марта сделась себе подарок и приобрести именно его. У меня швейная машинка Хускварна с швейным советником, для меня это огромное удобство. Хотелось бы узнать как ведет себя оверлок с трикотажными тканями и еще есть ли у Вас дополнительные лапки.
![]() Ленка-2
Ленка-2
Трикотаж шьет хорошо. Лапки дополнительные к нему не покупала, а только к машинке. Что конкретно интересует спрашивайте.
![]() Olgiya
Olgiya
Ленка-2 Раскажите о своей мошинке побольше как перенастройка происходит, как распошивачный шов выглядит, а также и на другие швы я бы не отказалась посмотреть и если можно меня очень ,очень интересует пошив трикотажа,может есть некоторые нюансы которыми вы можете поделиться с нами.
Зарание благодарю за ответ,Ольга.
![]() borqna
borqna
А что вы скажете о HUSQVARNA HS E10 ,потому что тук я могу купить только эту и я не знаю если эта машина хорошая. Спасибо вам заранее.
![]() redhat
redhat
На Тайване, на заводе Janome, производятся швейные машины Pfaff серии Hobby и Husqvarna серии Huskystar.
получается, что Huskystar это Husqvarna?
Пока соблазняюсь вот на эту модельку: Husqvarna Huskystar 219 http://market.yandex.ru/model.xml?hid=242704&modelid=935995
Что скажете?
Швейная машина Husqvarna Huskystar 219 — купить по выгодной цене на Яндекс.Маркете
Подробные характеристики швейной машины Husqvarna Huskystar 219, отзывы покупателей, обзоры и обсуждение товара на форуме.
Источник
Как настроить швейную машинку huskystar 219
На машинке шью и тонкие ткани и толстые. Недавно сшила пальто.И джинсы дочке переделывала. На оврлоке оказалось все легко и просто. А я боялась что не осилю! Швейный советник все подсказывает, хотя корректировать тоже приходится. Ткани то все разные. Но по крайней мере никогда не смотрю как настраивать шов в инструкции, смотрю что рекомендует советник и там уже все ясно. А замена пластины при распошивальных швах только в первый раз кажется долгой. А когда делаешь это чаще и не надо уже в инструкцию заглядывать, то все быстро. Особенно я люблю 4-х ниточным швом обрабатывать сыпучие ткани, так класно и шить потом намного удобнее, когда все уже обработано.
![]() Аманда
Аманда
У меня Платинум 770,я очень довольна.Когда подошло время покупать машинку,я сразу знала что это будет именно хускварна.Ни какой брайзер и рядом не стоял.Моя свекровь давно работала в швейном магазине и в машинках разбиралась поэтому ,и купила себе хускварну (не помню точно модель какая-то простенькая) и уже больше десяти лет прекрасно на ней шьет,то же самое у ее подруг которые купили хускварны,кто же взял себе брайзеры или поменяли их на другие машинки или несколько раз отдавали в ремонт.У моей сестры хускварна уже восемь лет и никаких проблем.Я однажды была у соседки,которая при мне шила на своем брайзере купленом год назад,он очень громко стучал. у моей мамы чайка 30-летней давности тише шьет чем этот брайзер.
![]() Ленка-2
Ленка-2
У оверлока Husqvarna Husky Lock 936 швы такие:
4-ниточный шов,
3-ниточный узкий и широкий шов,
3-ниточный плоский шов,
3-нитоный ролевый шов,
3-ниточная узкая кайма,
2-ниточный узкий и широкий шов,
2-ниточный плоский шов,
2-ниточный ролевый шов,
2-ниточная узкая кайма,
цепной стежок,
двойная узкая и широкая строчка,
тройная строчка,
5-ниточный оверлок.
Еще что очень удобно у него есть функция — свободный рукав.
![]() Olgiya
Olgiya
Husqvarna Husky Lock 936 ,я на него тоже запала , на фотохостинг →
но есть вероятность что его не будет в продаже ,тогда прийдётся покупать Пфафф 4852.
![]() Жи Лена
Жи Лена
Ура, ура наконец то появилась счастливая обладательница оверлока Хускварна. Я собираюсь к 8 марта сделась себе подарок и приобрести именно его. У меня швейная машинка Хускварна с швейным советником, для меня это огромное удобство. Хотелось бы узнать как ведет себя оверлок с трикотажными тканями и еще есть ли у Вас дополнительные лапки.
![]() Ленка-2
Ленка-2
Трикотаж шьет хорошо. Лапки дополнительные к нему не покупала, а только к машинке. Что конкретно интересует спрашивайте.
![]() Olgiya
Olgiya
Ленка-2 Раскажите о своей мошинке побольше как перенастройка происходит, как распошивачный шов выглядит, а также и на другие швы я бы не отказалась посмотреть и если можно меня очень ,очень интересует пошив трикотажа,может есть некоторые нюансы которыми вы можете поделиться с нами.
Зарание благодарю за ответ,Ольга.
![]() borqna
borqna
А что вы скажете о HUSQVARNA HS E10 ,потому что тук я могу купить только эту и я не знаю если эта машина хорошая. Спасибо вам заранее.
![]() redhat
redhat
На Тайване, на заводе Janome, производятся швейные машины Pfaff серии Hobby и Husqvarna серии Huskystar.
получается, что Huskystar это Husqvarna?
Пока соблазняюсь вот на эту модельку: Husqvarna Huskystar 219 http://market.yandex.ru/model.xml?hid=242704&modelid=935995
Что скажете?
Швейная машина Husqvarna Huskystar 219 — купить по выгодной цене на Яндекс.Маркете
Подробные характеристики швейной машины Husqvarna Huskystar 219, отзывы покупателей, обзоры и обсуждение товара на форуме.
Источник
User’s Guide
219/224
Type A
This houshold sewing machine is designed to comply with
IEC/EN 60335-2-28 and UL1594
IMPORTANT SAFETY INSTRUCTIONS
When using an electrical appliance, basic safety precautions should always be followed, including the following:
Read all instructions before using this household sewing machine.
DANGER —
To reduce the risk of electric shock:
• A sewing machine should never be left unattended when plugged in. Always unplug this sewing machine from the electric outlet immediately after using and before cleaning.
• Always unplug before relamping. Replace bulb with same type rated 15 Watt.
WARNING —
To reduce the risk of burns, fi re, electric shock, or injury to persons:
• This sewing machine is not intended for use by persons (including children) with reduced physical, sensory or mental capabilities, or lack of experience and knowledge, unless they have been given supervision or instruction concerning use of the sewing machine by a person responsible for their safety.
• Children should be supervised to ensure that they do not play with the sewing machine.
• Use this sewing machine only for its intended use as described in this manual. Use only attachments recommended by the manufacturer as contained in this manual.
• Never operate this sewing machine if it has a damaged cord or plug, if it is not working properly, if it has been dropped or damaged, or dropped into water.
Return the sewing machine to the nearest authorized dealer or service center for examination, repair, electrical or mechanical adjustment.
• Never operate the sewing machine with any air openings blocked. Keep ventilation openings of the sewing machine and foot controller free from the accumulation of lint, dust, and loose cloth.
fi ngers away from all moving parts. Special care is required around the sewing machine needle.
• Always use the proper needle plate. The wrong plate can cause the needle to break.
• Do not use bent needles.
• Do not pull or push fabric while stitching. It may defl ect the needle causing it to break.
• Switch the sewing machine off (“0”) when making any adjustment in the needle area, such as threading needle, changing needle, threading bobbin, or changing presser foot, etc.
• Always unplug sewing machine from the electrical outlet when removing covers, lubricating, or when making any other user servicing adjustments mentioned in the instruction manual.
• Never drop or insert any object into any opening.
• Do not use outdoors.
• Do not operate where aerosol (spray) products are being used or where oxygen is being administrated.
• To disconnect, turn all controls to the off (“0”) position, then remove plug from outlet.
• Do not unplug by pulling on cord. To unplug, grasp the plug, not the cord.
SAVE THESE INSTRUCTIONS
For the USA and Canada
This sewing machine has a polarized plug (one blade wider than the other). To reduce the risk of electric shock, this plug is intended to fi t in a polarized outlet only one way.
If the plug does not fi t fully in the outlet, reverse the plug. If it still does not fi t, contact a qualifi ed electrician to install the proper outlet. Do not modify the plug in any way.
TABLE OF CONTENTS
Name of Parts
Extension Table
To Store Foot Control
Standard Accessories
GETTING READY TO SEW
Connecting the Machine to the
Power Supply
Controlling Sewing Speed
Up/Down Needle Position Button 8
Reverse Stitch Button 8
6
7
Pressure Adjusting Dial
Dropping the Feed Teeth
Sewing Light
Presser Foot Lifter
8
9
9
10
To Remove and Attach the Presser Foot
To Remove and Attach
Presser Foot Ankle
10
Changing the Needle
Needle and Thread chart
Winding the Bobbin
Setting the Spool
10
11
11
Removing the Bobbin
Winding the Bobbin
Inserting the Bobbin
Threading the Machine
12
12
13
To Use Needle Threader
Drawing Up Bobbin Thread
Pattern Selector Dial
Stitch Length Dial
Zigzag Width Control
Infi nite Needle Position
Balancing Needle Thread Tension 20
Straight Stitching 21
18
18
19
19
14
15
16
17
Starting to Sew 21
Changing Sewing Direction 21
2-3
4
4
5
Finishing Sewing 22
Straight Stitching on Heavy Fabrics 23
Seam Allowance Lines 23
UTILITY STITCHING
Zigzag Stitching
Overcasting
Seam/Overcast stitch
Multiple ZigZag
Reinforced Straight Stitch
Lightening Stitch
Sewing Buttons
Automatic Buttonhole
Corded Buttonhole
Manual Buttonhole
Zipper Sewing
Blind Stitch Hemming
Decorative Satin Stitch Patterns 40
Stretch Stitch Patterns 40
Adjusting Stretch Stitch Balance 41
Smocking 42
32
33-34
35-38
39
24
24
25
25
26
26
27
28-31
Quilting
Pin Tucking
Shell Tuck
Fagoting
Patch Work
Applique
43
44
44
45
45
46
CARE OF YOUR MACHINE
Cleaning the Hook Assembly Area and Feed Teeth
Replacing the Bobbin Holder
Troubleshooting
47
48
49-50
1
08
09
10
11
07
12
29
30
31
26
27
06
28
05 04 03 02
01
22
21
20
19
13
14
15
16 17
25
32
24
23
33
18
36
35
34
Name of parts (Model 224)
01. Bobbin winder stopper
02. Bobbin winder spindle
03. Extra spool pin mounting hole
04. Spool holder
05. Spool pin
06. Thread tension dial
07. Thread take-up lever
08. Pressure adjusting dial
09. Face plate
10. Thread cutter
11. Needle threader
12. Needle plate
13. Extension table
14. Hook cover plate
15. Hook cover plate release button
16. Up/down needle position
button
17. Reverse stitch button
18. Speed setting lever
19. Pattern selector dial
20. Stitch length dial
21. Pattern indicating window
22. Zigzag width control lever
23. Presser foot
24. Needle
25. Needle clamp screw
26. Foot holder
27. Thumb screw
28. Carrying handle
29. Handwheel
30. Feed balance dial
31. Power switch
32. Machine sockets
33. Drop feed lever
34. Free arm
35. Buttonhole lever
36. Presser foot lifter
2
08
09
10
07
11
26
27
28
23
24
06 05
04 03
02
01
19
18
17
16
25
12
13
14
22
21
20
15
30
33
32
31
Name of parts (Model 219)
01. Bobbin winder stopper
02. Bobbin winder spindle
03. Extra spool pin mounting hole
04. Spool holder
05. Spool pin
06. Thread tension dial
07. Thread take-up lever
08. Pressure adjusting dial
09. Face plate
10. Thread cutter
11. Needle plate
12. Extension table
13. Hook cover plate
14. Hook cover plate release button
15. Reverse stitch button
16. Pattern selector dial
17. Stitch length dial
18. Pattern indicating window
19. Zigzag width control lever
20. Presser foot
21. Needle
22. Needle clamp screw
23. Foot holder
24. Thumb screw
25. Carrying handle
26. Handwheel
27. Feed balance dial
28. Power switch
29. Machine socket
30. Drop feed lever
31. Free arm
32. Buttonhole lever
33. Presser foot lifter
29
3
(1)
(2)
(2)
(1)
Extension Table
The extension table provides added sewing surface and can be easily removed for free arm sewing.
For free arm sewing
Remove the extension table by pulling it away from the machine, as illustrated.
(1) Pin
(2) Hole
(3)
To Store Foot Control
1. Insert the foot control in the extension
table.
2. Plug the cord into the holes on the
table.
(1) Plug
(2) Holes
3. Fold the cord as illustrated and store in the table.
(3) Cord
4
12
14
08
10
09
01
03
06
05
07
02
04
13
11
15
Standard Accessories
01. C: Overcast foot
02. E: Zipper foot
04. B: Transparent buttonsewing/
05. R: Automatic buttonhole foot
06. Set of needles
07. Bobbins
08. Screwdriver
09. Lint brush
10. Seam ripper
11. Quilter´s guide
12. Large spool holder
13. Small spool holder
14. Additional spool pin
15. Spool pin felt
16
16. Storage place
(Open the extension table and
store the standard accessories.)
5
3
5
4
2
1
7
6
GETTING READY TO SEW
Connecting the Machine to the
Power Supply (for Model 224)
After switching off the power 1 , connect the plugs in the order of
2, 4 and 6.
1. Power switch
2. Foot control plug
3. Foot control socket
4. Machine power plug
5. Machine power socket
6. Power supply plug
7. Wall outlet
1
4
3
2
5
Connecting the Machine to the Power Supply (for Model
219)
Before connecting the power, make sure the voltage and frequency of the machine conform to your electrical power supply.
Switch off the power, fi t the nonreversible plug into the machine socket and connect the power supply plug.
Switch on the power.
1. Power switch
2. Machine power plug
3. Machine power socket
4. Power supply plug
5. Wall outlet
6
Controlling Sewing Speed
Speed Setting Lever (for Model 224)
The maximum sewing speed can be controlled by the speed setting lever.
Foot Controller (Model 224)
Sewing speed can be varied by the foot control.
Foot controller type C-21365 for use with sewing machine Model 224
Foot Controller (Model 219)
Sewing speed can be varied by the foot control.
Foot controller type YC-482J (for USA and Canada only) or YC-190 for use with sewing machine Model 219
Note:
Some fabrics have a lot of excess dye which can cause discoloration on other fabric but also on your sewing machine.
This discoloring may be very diffi cult or impossible to remove.
Fleece and denim fabric in especially red and blue often contain a lot of excess dye.
If you suspect that your fabric/ready-to-wear garment contains a lot of excess dye, always pre-wash it before sewing/ embroidering to avoid the discoloring.
7
Needle Up/Down Position But ton
(for Model 224)
When you press this button, the needle will go up or down.
If the needle is up and you press this button, the needle will go down to its lowest position.
If the needle is down and you press this button, the needle will go up to its highest position.
Reverse Stitch Button
As long as you keep the reverse stitch button depressed, the machine sews backwards.
8
Presser foot Pressure
Adjusting Dial
The presser foot pressure adjusting dial should be set at 3 for regular sewing.
Reduce the pressure to 2 for applique, cutwork, drawnwork, basting and em broi dery for better maneuverability of fabric.
Velours and knits with a lot of stretch may require a 1 setting.
(1)
1
2
Dropping the Feed Teeth
* For button sewing and free motion sewing, drop the feed teeth.
* When fi nished sewing, raise the feed
teeth.
Drop feed lever is located to the back and underneath the free arm bed.
1. To raise the feed teeth.
2. To drop the feed teeth.
Note:
The feed teeth must always be up for normal sewing.
(2)
9
Sewing Light
The sewing light is located behind the face plate. To change the bulb, take the face plate off the sewing machine by removing the set screw.
Caution:
Unplug the power supply before changing the bulb and wait until the bulb has cooled down before touch ing it.
(1) Model 224 (12V, 5W)
To remove …….. Draw out slowly
To replace …….. Push in
(2) Model 219 (15W)
To remove ……… Push and twist to the
left.
To replace ……… Push and twist to the
right.
1
2
(3)
(2)
(1)
1
(1)
(2)
2
(1)
(3)
(2)
Presser Foot Lifter
The presser foot lifter raises and lowers your presser foot.
You can raise it about 0.6 cm (1/4˝) higher than the normal raised position for easy removal of the presser foot or to help you place heavy fabric under it.
(1) Presser foot lifter
(2) Normal raised position
(3) Extra lift position
(3)
To Remove and Attach the Press er Foot
Unplug the power supply before changing the presser foot.
1. Press the red button on the back of the presser foot ankle.
The presser foot will drop off.
2. Place the selected presser foot so the pin on the foot lies just under the groove of the foot ankle.
Lower the ankle to lock the foot in place.
(1) Red button
10
To Remove and Attach the Press er Foot Ankle
1. To Remove
Remove the thumb screw by turn ing the screw counterclockwise with the screwdriver.
(1) Thumb screw
2. To Attach
Match the hole in foot ankle with
the threaded hole in the presser bar. Fit the thumb screw into the hole Tighten the screw by turning it clock wise.
1
(2)
(1)
2
(1)
(3)
Changing the Needle
1. Raise the needle by pressing the up/down needle position button and lower the presser foot.
Turn off the power switch.
Loosen the needle clamp screw by turning it coun ter clock wise. Remove the needle from the clamp.
2. Insert the new needle into the needle clamp with the fl at side to the rear. When inserting the needle into the clamp push it up as far as it will go and tighten the clamp screw fi rmly.
(1) Needle clamp screw
(3) Flat side of the needle
Needle and Thread Chart
Needle size
No. 60 (#7)
No. 70 (#10)
No. 75 (#11)
No. 80 (#12)
No. 80 (#12)
No. 90 (#14)
No. 100 (#16)
Stretch needle
No. 70 (#10)
Fabric
Fine silk
Crepe de chine
Poplin
Pure Silk
Broad cloth
Cotton
Wool
Denim
Tricot
Cotton thread size
70 — 80
50 — 60
Silk thread size
100 — 140
80 — 100
40 — 50
30 — 40
30
70 — 80
60 — 70
50 — 60
45 — 50
100 — 140
11
(1)
(2)
Winding the Bobbin
Settting the Spool
Lift up the spool pin and place the spool of thread on it with the thread coming off the spool as shown.
Press the large spool holder fi rmly against the spool of thread with the fl at side of the spool holder against the spool of the thread.
(1) Large spool holder
(2) Small spool holder
(1)
Removing the Bobbin
Gently slide the bobbin cover plate release button to the right and remove the cover plate.
Lift out the bobbin.
(1) Bobbin cover plate release button
(2) Bobbin cover plate
(2)
12
3
4
5
1
2
A
13
B
(2)
(1)
(3)
Winding the Bobbin
1. Guide the thread around the thread
guide.
2. Thread through the hole in the bob bin from the inside to the outside. Put the bobbin on the bobbin winder spindle.
3. Slide it to the right.
Caution:
Never move the bobbin winder spindle when the machine is running.
4. With the free end of the thread held in your hand, depress the foot control.
Stop the machine when it has made a few turns, and cut the thread close to the hole in the bobbin.
5. Depress the foot control again. When the bobbin is fully wound, it will stop automatically. Return the bobbin winder to its original position by moving the spindle to the left, and cut the thread as shown.
To use the additional spool pin, set the felt and the spool as shown above.
(1) Additional spool pin
(2) Felt
(3) Additional spool pin hole
1
2
3
4
B
A
Inserting the Bobbin
1. Place the bobbin in the bobbin holder with the thread running counterclockwise.
2. Guide the thread into the notch A on the front side of the bobbin holder.
Draw the thread to the left, sliding it between the tension spring blades.
3. Continue to draw the thread lightly until the thread slips into notch B.
Note:
Check the threading by referring to the chart shown on the bobbin cover plate.
4. Pull out about 15 cm (6 inches) of thread and attach the bobbin cover plate.
14
Threading the Machine
3
1
3
4, 5
1
4
5
2
2
Raise the thread take-up lever to its highest position by turning the handwheel toward you.
Raise the presser foot with the presser foot lifter and pass the thread in the order from
1 to 5 .
1. Bring the thread from the spool and pass it through the thread guide.
Then draw it down along the right slot.
2. Guide the thread around the bottom of the thread guide plate from right to left, then draw it upward.
3. Firmly draw the thread from right to left over the take-up lever and down into the take-up lever eye. Then guide it down along the left slot.
4. Slide the thread from the left behind the needle bar thread guide.
5. Thread the needle from front to back.
15
1
2
3
4
To Use Needle Threader
(for Model 224)
1. Raise the needle to its highestposition.
Lower the needle threader as far as it will go.
2. Push the knob in the direction of the arrow in the illustration, and insert the hook into the needle eye.
Bring the thread around the guide and under the hook.
(1)
(2)
3. Push the knob in the direction of the arrow in the illustration, and draw the thread loop to the back of the needle.
4. Raise the needle threader knob slowly to draw the thread loop up.
Pass the end of the thread through the needle eye by pulling the thread loop to the back.
16
1
Drawing Up Bobbin Thread
1. Raise the presser foot and hold the needle thread lightly with your left hand.
2
3
(2)
(1)
2. Press the up/down needle position button twice to pick up the bobbin
thread.
Draw up the needle thread forming a loop of bobbin thread.
(1) Needle thread
(2) Bobbin thread
3. Pull 15 cm (6 inches) of both threads back and under the presser foot.
17
(2)
1
2
(2)
C
A
(1)
Pattern Selector Dial
B
(Model 224)
(Model 219)
A. Recommended
stitch length
B. Set any stitch
length
C. Reset in di ca tion
for buttonhole
Turn the pattern selector dial to indicate a selected pattern on the pattern indicating window.
(1) Pattern selector dial
(2) Pattern indication window
Note:
Always raise the needle above the fabric and presser foot before you turn the pattern selector dial.
(1)
Stitch Length Dial
The higher the number, the longer the stitch length. You can select the suitable stitch length for fabrics that you plan to sew.
(1) Stitch length dial
(2) Setting mark
Note:
Always raise the needle above the fabric and presser foot before you turn the stitch length dial.
18
19
Zigzag Width Control
The higher the number, the wider the stitch width becomes.
Note:
Always raise the needle above the fabric and presser foot before you turn the zigzag width control.
Infi nite Needle Position
When pattern number 14 is selected and the stitch width control is activated, you can move the needle between center and left needle positions.
(1)
(3)
(2)
(4)
Balancing Needle Thread Ten sion
The needle thread and the bobbin thread should interlock in the center of two layers of fabric in straight seams.
To obtain better zigzag stitches, the needle thread tension should be slightly weaker than in the case of straight sewing. The needle thread should appear slightly on the reverse side of the fabric.
(1) Needle thread
(2) Bobbin thread
(3) Right side
(4) Wrong side
To loosen needle thread tension
Loosen the needle thread tension by moving the dial to a lower number.
To tighten needle thread tension
Tighten the needle thread tension by moving the dial to a higher number.
20
(1)
14
(4)
(2)
0 1 2 3 4 5 6
(5)
(3)
Straight Stitching
(1) Stitch selector:
(2) Stitch width:
(3) Stitch length:
14
0 or 6
1.5 — 4
(4) Top thread tension: 2 — 6
(5) Presser foot: A: Zigzag foot
Starting to Sew
Raise the presser foot and position the fabric next to a seam guide line on the needle plate (see page 23).
Lower the needle to the point where you want to start.
Lower the presser foot and pull the threads toward the back. Depress the foot control.
Gently guide the fabric along the seam guide line letting the fabric feed naturally.
Changing Sewing Direction
Stop the machine and bring the needle down into the fabric by pressing the up/down needle position button (or by turning the handwheel for Model 219).
Raise the presser foot.
Pivot the fabric around the needle to change sewing direction as desired.
Lower the presser foot.
21
1
2
3
Finishing Sewing
1. To fasten the ends of seams, press the reverse button and sew several reverse stitches.
2. Raise the presser foot. Remove the fabric, and draw the threads to the back.
3. Cut the thread using the thread cutter.
The threads are cut the proper length for starting the next seam.
22
(2)
(1)
Straight Stitching on Heavy
Fabrics
1. Lower the needle into the fabric at the point where you wish to start sewing.
Press the small black button on the zigzag foot with your left hand to
lock the presser foot to the fabric.
2. Lower the presser foot with your right hand, keeping pressure on the black button with your left hand.
3. Release the black button and start
sewing.
(1) Black button
(1)
23
Seam Allowance Lines
The seam guides on the needle plate and bobbin cover plate help you measure the seam width.
(1) Seam allowance lines
Number 15 20 1/2 5/8 3/4
Distance (cm) 1.5 2.0 1.3 1.6 1.9
Note:
The numbers indicate the distance between the middle needle position and the seam allowance lines.
Turning a Square Corner
Stop stitching and lower the needle when the fabric edge facing you lines up with the cornering guides as shown.
Raise the presser foot and turn the fabric to line up to the edge with the 1.6 cm (5/8 inch) seam guide.
Lower the presser foot and begin stitching in the new direction.
(2) Cornering guides
(1)
13
(4)
(2)
(5)
(3)
UTILITY STITCHING
Zigzag Stitching
(1) Stitch selector:
(2) Stitch width:
13
0 — 6
(3) Stitch length: 0.5 — 3
(4) Top thread tension: 3 — 5
(5) Presser foot: A: Zigzag foot
Simple zigzag stitching is widely used for overcasting, applique and sewing on buttons.
(1)
13
(4)
(2)
(6)
(5)
(3)
Overcasting
(1) Stitch selector:
(2) Stitch width:
(3) Stitch length:
13
5 or 6
1 — 2
(4) Top thread tension: 4 — 7
(5) Presser foot: C: Overcast
foot
24
This type of stitch is used on the seam allowance to prevent fabrics from fraying at raw edges.
It can be used to fi nish a hem edge.
Place the edge of the fabric next to the black guide of foot C .
(6) Black guide
(1) (2)
19
Seam/Overcast Stitch
(1) Stitch selector: 19
(2) Stitch width: 5 or 6
(3) Top thread tension: 4 — 7
* Stitch length:
C: Overcast foot
Set any length
Place the edge of the fabric next to the black guide on the foot and brush guide.
The wires on this foot prevent light weight fabric from rolling and creating a ridge.
As you sew the needle falls off the fabric wrapping the threads around the raw edge to prevent raveling.
(5) Black guide
(5)
(1) (2) (3)
12
(4)
Multiple ZigZag
(1) Stitch selector:
(2) Stitch width:
(3) Stitch length:
12
3 — 6
0.5 — 1.5
(4) Top thread tension: 4 — 6
(5) Presser foot: A: Zigzag foot
(5)
25
This stitch is used to fi nish the seam allowance on synthetics and other fabrics that tend to pucker.
Place your fabric to allow a 1.6 cm (5/8 inch) seam.
Trim the extra seam allowance edge after sewing as illustrated.
Note:
Be careful not to cut the stitch es.
(1) (2)
16
0 1 2 3 4 5 6
Reinforced Straight Stitch
(1) Stitch selector: 16
(2) Stitch width: 0 or 6
(3) Top thread tension: 3 — 6
* Stitch length:
A: Zigzag foot
Set any length
(1)
15
(3)
(2)
(4)
This strong, durable stitch is recommended where both elasticity and strength are needed to ensure comfort and durability.
Use it to reinforce areas such as crotch and armhole seams.
Also use it when constructing items such as backpacks for extra reinforcement.
The stitch is sewn with two stitches forward and one stitch backward, forming a seam that does not rip easily.
Garments should be basted for fi tting before seaming.
Lightening Stitch
(1) Stitch selector: 15
(2) Stitch width: 4 — 5
(3) Top thread tension: 3 — 6
(4) Presser foot:
* Stitch length:
A: Zigzag foot
Set any length
26
This stitch is used for seaming tricot and light weight knit fabrics, it permits the seam to be pressed completely fl at and prevent thread breaking with stretch fabric seams.
For a 1.5 cm (5/8 inch) seam, use the 2 cm
(6/8 inch) marking on the needle plate.
When sewing light weight knit fabrics, set the pressure dial at 1 or 2.
(1)
13
(3)
(2)
0 1 2 3 4 5 6
(5)
(4)
Sewing Buttons
(1) Stitch selector: 13
(2) Stitch width: 3 — 3.5
(3) Top thread tension: 4 — 7
(4) Presser foot: B: Trans par ent
buttonsewing
foot
(5) Feed teeth lowered
* Stitch length: Set any length
Tape the button over the placement mark.
A pin can be placed on top the foot to form a shank. Before lowering the foot, test the needle swing, making sure the needle drops in each hole.
Adjust the stitch width if necessary and lower the foot.
Align both holes of the button with the needle swing, lower the foot and depress the foot control.
Sew about 10 stitches, then pull out approximately 20 cm (8 inches) of both the needle and bobbin thread and cut.
Pull the needle thread down through the hole in the button (so it is between the hole and fabric).
Now, pull the needle thread fi rmly to draw the bobbin thread up through the fabric.
Wind one thread clockwise around the shank, the other counterclockwise.
Finally, tie the 2 threads together.
Note:
When sewing on the button is completed, raise the feed teeth.
27
(1)
1
1.
2.
(4)
(1)
(2)
(5)
(3)
0
1
(2)
Automatic Buttonhole
(1) Stitch selector: 1
(2) Stitch width: 4 — 6
(3) Stitch length: 0.5 — 1
(4) Top thread tension: 2 — 5
(5) Presser foot: R: Automatic
buttonhole
foot
* The size of buttonhole is au to mat i cal ly set by placing the button in the automatic buttonhole foot R.
* The button holder of the foot takes a button size up to 2.5 cm (1 inch) in diameter.
* Make a test buttonhole on a fabric sample duplicating the interfacing and seams of the actual garment.
* Place the button on the fabric sam ple and mark the top and bottom to determine the position of the but ton hole.
* Use interfacing on stretch fabrics.
* Use stabilizer under all fabrics
1. Attach the automatic buttonhole foot
R. Make sure the groove on the holder catches the pin on the foot when lowering the presser foot.
(3)
(4)
28
2. Pull the button holder to the back, and place the button in it. Push it together tightly on the button.
(3) Button holder
If the button is extremely thick, make a test buttonhole. If it is diffi cult to fi t the button through the test buttonhole, lengthen the size by pulling back the button holder which will increase the buttonhole length.
(4) Gap
3
(5)
3. Pull the buttonhole lever downward as far as it will go.
4
(6)
(7)
(9)
(10)
(13)
(11)
(12)
(8)
4. Draw both threads to the left under the foot. Insert the garment under the foot, and lower the needle at the starting point.
Then lower the automatic buttonhole foot.
(6) Needle thread
(7) Bobbin thread
(9) Starting point
Note:
Make sure there is no gap between the slider and the spring holder.
If there is a gap, the length of the rows will be different, as shown.
(11) Spring holder
(13) There should be no gap.
29
5
6
1 2
5. Sew slowly and stop the machine at the starting point when the but ton hole is completed.
Step 1: First the front bartack and left row
is sewn.
Step 2: Next the back bartack, a locking
stitch and the right row is sewn.
6. Cut both needle and bobbin threads leaving about 10 cm (4 inches) of thread ends loose. Draw the needle thread to the wrong side of the fabric by pulling the bobbin thread.
Then, knot the threads.
Place a pin on the rear side of the bartack position so that you do not need to worry about cutting the end of the buttonhole stitch. Then cut the opening with a seam ripper.
(To sew a series of same-size buttonholes)
To reset the buttonhole sewing function, select a different stitch pattern with the pattern selector dial 2, then return it to the buttonhole.
30
7
7. When fi nished, push the button hole lever up as far as it will go.
0
1
To adjust buttonhole stitch density.
Set the stitch length dial between 0.5 and
1.0 to adjust the buttonhole stitch density.
31
1
2
3
(1)
1
(1)
(2)
(4)
(2)
(3)
(4)
(5)
(3)
0
1
32
Corded Buttonhole
(1) Stitch selector:
(2) Stitch width:
(3) Stitch length:
1
4 — 6
0.5 — 1
(4) Top thread tension: 2 — 5
(5) Presser foot: R: Automatic
buttonhole
foot
1. Use the same procedure as described in automatic buttonhole sewing steps.
Note:
Set the stitch width to match the thickness of the cord used.
(1) With the buttonhole foot raised, hook the fi ller cord on the spur at the back of the buttonhole foot.
Bring the ends toward you under the buttonhole foot, clearing the front end.
Hook the fi ller cord into the forks on the front of automatic buttonhole foot R to hold them tight.
Lower the needle into the garment where the buttonhole will start and lower the foot.
2. Depress the foot control gently and sew the buttonhole. Each side of the buttonhole and the bartacks will be sewn over the cord.
Remove the fabric from the machine and cut the sewing threads only.
(2) Needle thread
(3) Bobbin thread
(4) Starting point
3. Pull the left end of the fi ller cord to tighten it. Thread the end of the cord through a darning needle, draw to the wrong side of the fabric and cut.
Note:
To cut the buttonhole opening, refer to the instructions on page 30.
(1)
1
1.
(4)
(2)
(5)
(3)
0
1
Manual Buttonhole
(1) Stitch selector:
(2) Stitch width:
(3) Stitch length:
1
4 — 6
0.5 — 1
(4) Top thread tension: 2 — 5
(5) Presser foot: B: Trans par ent
buttonhole foot
Note:
If the diameter of the button is more than 2.5 cm (1 inch), a buttonhole must be made manually as follows.
1. Attach the buttonhole foot B.
2, 3
(1)
(2)
(3)
2. Pull the buttonhole lever downward as far as it will go.
3. Lower the needle into the garment where the buttonhole is to start, and lower the foot.
(1) Needle thread
(2) Bobbin thread
(3) Starting point
33
4
5
6
7
34
4. Sew the front bartack and left row, then stop the machine after sewing the desired total length of but ton hole.
5. Pull the buttonhole lever toward you.
6. Sew the back bartack and right row, then stop the machine at the starting point.
7. When fi nished, push the buttonhole lever up as far as it will go.
(1)
14
(4)
(2)
0 1 2 3 4 5 6
(5)
(3)
Zipper Sewing
(1) Stitch selector:
(2) Stitch width:
(3) Stitch length:
14
0
1.5 — 4
(4) Top thread tension: 3 — 6
(5) Presser foot: E: Zipper foot
(3)
(1)
(2)
(4)
To Snap On the Zipper Foot
Fit the pin on the zipper foot into the groove on the ankle.
To sew the left side of the zipper
Attach the zipper foot on the right-hand side.
To sew the right side of the zipper
Attach the zipper foot on the left-hand side.
1
(1)
(8)
(9)
(3) (4)
(3) When the left side is sewn
(4) When the right side is sewn
(2)
(5)
(7)
(6)
Fabric Preparation
1. Add 1 cm (3/8 inch) to the zipper size.
This is the overall opening size.
(1) Right side of fabric
(2) 1 cm (3/8 inch)
(4) Zipper size
(6) Zipper teeth
(7) Zipper tape
(8) Wrong side
(9) End of opening
35
2
2. Place right sides of fabric together and sew to the end of the zipper opening.
Reverse stitch to lock the stitches.
Manually increase the stitch length to
4 and sew the zipper opening.
(10) 2 cm (3/4 inch)
(11) 11.3 cm (Stitch length)
(12) Reverse stitch
(13) End of opening
(14) Straight stitch
1
2
(5)
(2)
(1)
(3)
(4)
(6)
To Sew
1. Fold back the left seam allowance.
Turn under the right seam allowance to form a 0.2 to 0.3 cm (1/8 inch) fold.
Place the zipper teeth next to this fold and pin in place.
2. Attach the zipper foot with the pin on the right hand side.
Lower the zipper foot on the top side at the bottom of the zipper so that the needle pierces the fabric next to the fold and the zipper tape.
(8)
(7)
(4) 0.3 cm (1/8 inch)
(5) Wrong side of fabric
(7) Fold
(8) Basting stitch line
(3)
(5)
36
3
(9)
(10)
4
3. Sew through all layers next to the fold.
Stop just before the zipper foot reaches the slider on the zipper tape. Lower the needle slightly into the fabric. Raise the zipper foot and open the zipper. Lower the foot and stitch the remainder of the seam.
(11)
(9)
(12)
4. Close the zipper and spread the fabric fl at with the right side facing up.
Baste the opened fabric and zipper
37
5
(14)
6
(13)
5. Remove the zipper foot and reattach it on its left side. Guide the edge of the foot along the zipper teeth and stitch through the garment and zipper tape.
Stop about 5 cm (2 inches) from the top of the zipper.
(13) Remove the basting stitches
(14) Reverse stitches (0.7 — 1cm)
6. Lower the needle slightly into the fabric, raise the foot, remove the basting stitches and open the zipper.
Lower the foot and stitch the remainder of the seam, making sure fold is even.
the
38
1
2
3
4
(1)
(1)
(3)
(4)
(2)
0 1 2 3 4 5 6
(5)
(3)
Blind Stitch Hemming
(1) Stitch selector:
(2) Stitch width:
(3) Stitch length:
9
3 — 4
2
(4) Top thread tension: 2 — 5
(5) Presser foot: G: Blind hem foot
(2)
(8)
(1)
(5)
(4)
(6)
(7)
(2)
1. How to fold the fabric
(1) Wrong side of fabric
(2) 0.4 — 0.7 cm (5/32 — 1/4 inch)
(3) Heavy weight fabric
(4) Light/Medium weight fabric
2. How to sew
When the needle comes to the left hand side, position the fabric so that the folded edge comes to the left side of the guide. Lower the presser foot.
3. Adjust the position of the needle swing with the stitch width button so that the needle just pierces the folded edge of the fabric when the needle comes to the left side. Sew, guiding the folded edge along the guide.
(5) Guide dial
(7) Folded edge
4. Open the fabric after sewing, and press fl at.
(8) Right side of fabric
Note:
For a professional looking hem, try not to let the needle pierce more than 0.2 cm (1/8 inch) into the fold.
If the folded edge is pierced too far to the left side, you can not expect a good seam on the right side of the fabric.
39
(1)
2 3 4 5 6
0
1
(3)
(3)
(4)
(4)
(2)
(5)
(1)
15 16 17 18 19 20 21 22 23 24
(2)
Decorative Satin Stitch Patterns
(1) Stitch selector:
(2) Stitch width:
2 — 6
3 — 6
(3) Stitch length: 0.5
(4) Top thread tension: 2 — 5
(5) Presser foot: A: Zigzag
foot
Satin stitches are used for decorative stitches on blankets, linens, tableclothes and napkins. It is also especially attractive in applique.
Note:
Use tear-away stabilizer under fabric.
Sew a row of stitches and adjust the thread tension so the upper thread appears on the reverse side of the fabric. Test the stitch on a sample of the actual fabric fi rst.
Stretch Stitch Patterns
(1) Stitch selector: 15 — 24 (Model 224)
15 — 19 (Model 219)
(2) Stitch width: 3 — 6
(3) Top thread tension: 2 — 4
(4) Presser foot:
*Stitch length:
A: Zigzag
foot
Set any length
The stretch stitch does not actually stretch as it is being sewn, but is stitched in a forward and backward motion (sometimes called a reverse action stitch), so that it will expand when the fabric stretches instead of breaking. This stitch can also be used for topstitching on all fabrics
Note:
We recommend a stretch needle for stretch, knit or organdy fabric to prevent skipped
stitches.
40
(3)
Adjusting Stretch Stitch Balance
If stretch stitch patterns are uneven when sewn on a particular fabric, adjust them with the feed balance dial.
(1) Feed balance dial
(2) Standard mark
(3) Setting mark
(4) Example: Pattern 18
(A)
(1)
(4)
(2)
(B)
To Adjust distorted patterns
(A) If patterns are compressed, correct by turning the dial in the direction of
(B) If patterns are drawn out, correct by turning the dial in the direction of ( — )
41
(1)
18 24
(3)
(1)
(2)
(4)
(1)
Smocking
(1) Stitch selector:
(2) Stitch width:
18 or 24
3 — 6
(3) Top thread tension: 3 — 5
(4) Presser foot: A: Zigzag foot
*Stitch length: Set any length
With the manual stitch length at 11.3 cm
(4.5 inch), sew straight lines 1 cm (3/8 inch) apart, across the area to be smocked.
A looser needle thread tension will make gathering easier. Knot the threads along one edge.
Pull the bobbin threads and distribute the gathers evenly.
Secure the threads at the other end.
Reduce the tension and pressure if necessary and sew pattern stitches be tween the straight seams.
Pull out the gathering stitches.
(1) 1 cm (3/8 inch)
42
(1)
14
(4)
(2)
0 1 2 3 4 5 6
(3)
(5)
(6)
(1)
(2)
(3)
(4)
The quilting guide will help to keep the stitching lines straight.
Loosen the quilt guide holding screw.
Slide the quilt guide in the opening to the desired width and tighten the screw.
Sew, guiding the quilt guideover the previous row of stitching.
(1) Quilt Guide holding screw
(3) Quilt Guide
t
Quilting
(1) Stitch selector:
(2) Stitch width:
(3) Stitch length:
14
0 or 6
1.5 — 4
(4) Top thread tension: 3 — 6
(5) Presser foot: A: Zigzag foot
(6) Quilter
43
(1)
14
(4)
(2)
0 1 2 3 4 5 6
(5)
(3)
(1)
11
(4)
(2)
(1)
(2)
(5)
(3)
44
Pin Tucking
(1) Stitch selector:
(2) Stitch width:
(3) Stitch length:
11
5 — 6
2 — 3
(4) Top thread tension: 6 — 8
(5) Presser foot: G:Blind stitch
hem foot
Fold the fabric with wrong sides together on the foldline. Position the fabric so that the needle pierces 0.1 to 0.2 cm (1/16 inch) inside from the folded edge and lower the presser foot. Turn the guide screw and move the sliding guide next to the folded edge. Sew guiding the folded edge along the sliding guide. Press the pin tucks to one side.
(1) Guide screw
(2) Sliding guide
Shell Tuck
(1) Stitch selector:
(2) Stitch width:
11
5 — 6
(3) Stitch length: 2
(4) Top thread tension: 6 — 8
(5)Presser foot: B:Transparent
buttonhole foot
Note:
Use a lightweight fabric such as tricot. Fold and stitch on the bias.
Set the stitch width and length as you desire.
You may need to tighten the top thread slightly.
Allow the needle to just clear the folded edge of the fabric when it zigzags.
If you sew rows of shell stitches, space the rows 1.5 cm (5/8 inch) apart.
You can sew shell stitches on knits or soft silky wovens in any direction.
(1)
10
20
(4)
(2) (3)
(5)
Fagoting
(1) Stitch selector:
(2) Stitch width:
(3) Stitch length:
8, 10
20 (Model 224)
3 — 6
1
*Set any length for pattern 20
(4) Top thread tension: 2 — 5
(5) Presser foot: A: Zigzag foot
Fold under each fabric edge 1.5 cm (1/2 inch) and press.
Pin the two edges a tear-away stabilizer backing 0.3 cm (1/8 inch) apart.
Sew slowly, guiding the fabric so the needle catches the folded edge on each side.
Remove the backing when fi nished.
(1)
12
(4)
(2) (3)
(5)
(1) (1)
Patch Work
(1) Stitch selector:
(2) Stitch width:
8, 12
5 — 6
(3) Stitch length: 1
(4) Top thread tension: 2 — 5
(5) Presser foot: A: Zigzag foot
Sew seam and press seam allowance open.
Sew pattern stitch on right side of garment centering over the seam line.
(1) Right side of fabric
45
(1)
13
(4)
(2)
0 1 2 3 4 5 6
(3)
(5)
(6)
Applique
(1) Stitch selector:
(2) Stitch width:
(3) Stitch length:
13
3 — 5
0.5 — 1
(4) Top thread tension: 3 — 5
(5) Presser foot: B:Transparent buttonhole foot
(6) Presser Dial: 2
(1)
Baste (or fuse with iron-on fusible web) ap pli que pieces on the fabric.
Stitch around the applique making sure the needle falls along the outer edge of the applique.
When sewing corners, lower the needle down into the fabric. Raise the presser foot and pivot the fabric to the right or left.
Note:
When applique sewing is fi nished, return the pressure dial to 3.
46
3
4
5
1
2
(1)
CARE OF YOUR MACHINE
Caution
Before performing any of the following,make sure that the sewing machine is unplugged from the power source. Do not dismantle the machine other than explained on this page.
Cleaning the Hook Assembly
Area and Feed Teeth
1. Remove the presser foot and needle.
Remove the screw on the left side of the needle plate with the screwdriver supplied with the machine.
2. Remove the needle plate and take out the bobbin.
Lift up the bobbin holder and remove it.
3. Brush out dust and lint.
4. Clean the feed teeth and hook as sem bly area with the lint brush.
47
5. Wipe out gently with a soft, dry cloth.
Note:
You may also use a vacuum cleaner.
1
Replacing the Bobbin Holder
1-2. Insert the bobbin holder so that the
knob fi ts next to the stopper in the
hook assembly area.
2
3
(4)
(3)
(1)
(2)
(3)
3. Insert the bobbin.
Replace the needle plate, inserting the two needle plate guide pins into the holes in the needle plate.
Replace the screw.
(3) Guide hole
After cleaning, be sure to replace the needle and presser foot.
48
Troubleshooting
Condition
The needle thread breaks.
Cause
1. The needle thread is not threaded
properly.
2.
3.
The needle thread tension is too tight.
The needle is bent or blunt.
4.
5.
The needle is incorrectly inserted.
The needle thread and the bobbin thread are not set properly under (drawn to the rear of ) the presser foot when sewing is
starting.
6. The fabric is not drawn to the rear when
7. sewing is fi nished.
The thread is too heavy or too fi ne for
Refer to page 15
Refer to page 20
Refer to page 11
Refer to page 11
Refer to page 21
Refer to page 22
Refer to page 11
8. The thread is old and brittle.
Reference
The bobbin thread breaks.
The needle breaks.
1.
2.
3.
The bobbin thread is not threaded properly in the bobbin holder.
Lint has collected in the bobbin holder.
The bobbin is damaged and doesn´t turn
smoothly.
Refer to page 14
Refer to page 47
Change the bobbin.
1.
2.
3.
4.
The needle is incorrectly inserted.
The needle is bent or blunt.
The needle clamp screw is loose.
The fabric is not drawn to the rear when
5. sewing is fi nished.
The needle is too fi ne for the fabric being
sewn.
Refer to page 11
Refer to page 11
Refer to page 11
Refer to page 22
Refer to page 11
Skipped stitches 1.
2.
3.
The needle is incorrectly inserted.
The needle is bent or blunt.
The needle and/or threads are not suitable for the work being sewn.
4. A blue tipped needle is not being used for sewing stretch, very fi ne fabrics or
synthetics.
5. The needle thread is not threaded
properly.
6. The wrong needle is used.
Refer to page 11
Refer to page 11
Refer to page 11
Refer to page 11
Refer to page 15
Change the needle.
Seam puckering 1.
2.
The needle thread tension is not tight.
The needle thread is not threaded
properly.
3. The needle is too heavy for the fabric
4.
5.
The stitch length is too long for the fabric.
The presser foot pressure is not correctly
adjusted.
Refer to page 20
Refer to pages 14, 15
Refer to page 11
Make stitch denser.
Refer to page 8
49
Troubleshooting, continued
Condition
The fabric is not feeding smoothly.
Cause
1.
2.
The feed teeth are packed with lint.
The stitches are too fi ne.
3. The feed teeth were not raised after being
lowered.
Reference
Refer to page 47
Make stitch coarser
Refer to page 9
Gathering
The machine does not work.
Patterns are distorted.
The automatic buttonhole stitches are not working.
1.
2.
The needle thread tension is too loose.
The needle is too heavy or light for the fabrics being sewn.
Refer to page 20
Refer to page 11
1.
2.
3.
The machine is not plugged in.
A thread is caught in the hook
The bobbin winder spindle is still in the winding position.
1.
2.
The stitch is not balanced.
The stitch lenght is too long or too short
1. The stitch density is not suitable for the fabric being sewn.
2. Interfacing is not being used with stretch
fabrics.
Refer to page 6
Refer to page 47
Refer to page 13
Refer to page 42
Refer to pages 28, 31
Refer to page 28
Noisy operation 1.
2.
There is thread caught in the hook
Lint has built up in the bobbin holder or hook assembly are.
Refer to page 47
Refer to page 47
50
We reserve the right to change the machine equipment and the ass ort ment of accessories without prior notice, or make modifi cations to the performance or design.
Such modifi cations, however, will always be to the benefi t of the user and the product.
Please note that on disposal, this product must be safely recycled in accordance with relevant National legislation relating to electrical/electronic products. If in doubt please contact your retailer for guidance.
- Home
- Бренды
- Huskystar
- швейные машины
Ищете товар?
Искать среди 7 Huskystar товаров
Huskystar 215
Huskystar E10
Huskystar C10
Huskystar E20
Huskystar ER10
Huskystar C20
Huskystar 215
Huskystar E10
Huskystar C10
Huskystar E20
Huskystar ER10
Huskystar C20
Huskystar EM10
В этой категории вы найдете все руководства пользователя для Huskystar швейные машины. Если вашего швейные машины нет в этом списке, пожалуйста, воспользуйтесь окном поиска в верхней части интернет-сайта. Ваш швейные машины мог быть размещен в другой категории.